Fix Raspberry Pi Behind Router SSH Issues: A Quick Guide
Is your Raspberry Pi refusing to play ball when you're trying to access it remotely? It's highly probable that your router is the culprit, silently blocking your commands and turning your remote access dreams into a frustrating reality.
The allure of controlling your Raspberry Pi from anywhere in the world is undeniable. However, this ambition often crashes against the harsh wall of router configurations, leaving you stranded and unable to connect. The issue of Raspberry Pi control behind a router isn't a niche problem; it's a common hurdle for enthusiasts and professionals alike. It often manifests as an inability to establish an SSH connection, the secure shell that's your best friend for remotely managing the device. This article will delve into the common causes and actionable solutions to get your Raspberry Pi back under your command, no matter where you are.
| Category | Information |
|---|---|
| Problem: | Raspberry Pi behind a router not accessible remotely, specifically SSH connection failing. |
| Common Causes: |
|
| Solutions: |
|
| Additional Tips: |
|
| Advanced Techniques: | Reverse SSH Tunnels |
| Reference Website: | Raspberry Pi Official Website |
One of the most frequent roadblocks in achieving seamless Raspberry Pi control behind a router is incorrect port forwarding. Routers act as gatekeepers, managing traffic between your local network and the outside world. When your Raspberry Pi resides behind this gate, external devices need a specific pathway to communicate with it. This pathway is established through port forwarding. If the settings are misconfigured or absent, your attempts to connect will be met with silence.
Port forwarding essentially tells your router: "Hey, when someone knocks on this particular port (usually 22 for SSH), direct them to this specific device (your Raspberry Pi)." To configure this, you'll need to access your router's settings, typically through a web browser by entering its IP address (often 192.168.1.1 or 192.168.0.1). The exact steps vary depending on your router's make and model, but you'll generally be looking for a section labeled "Port Forwarding," "NAT," or "Virtual Servers." You'll need to specify the external port (the port you'll use to connect from outside your network), the internal port (usually 22 for SSH), the protocol (TCP), and the internal IP address of your Raspberry Pi.
However, port forwarding is just one piece of the puzzle. Firewalls, both on your router and on the Raspberry Pi itself, can also be formidable obstacles. Firewalls act as security guards, meticulously scrutinizing incoming and outgoing traffic and blocking anything that doesn't meet their pre-defined criteria. If your firewall is configured to block SSH connections, your remote access attempts will be futile.
On your router, firewall settings are usually found in the same interface as port forwarding. Ensure that your firewall isn't blocking incoming connections on port 22. On the Raspberry Pi, you can use the `ufw` (Uncomplicated Firewall) command-line tool to manage firewall rules. To allow SSH connections, you can use the command `sudo ufw allow 22`. Remember to enable the firewall with `sudo ufw enable` after making changes.
Another common culprit is the dynamic IP address assigned to your Raspberry Pi by your router. Most home routers use DHCP (Dynamic Host Configuration Protocol) to automatically assign IP addresses to devices on the network. This means that your Raspberry Pi's IP address might change every time it reconnects to the network. If you've configured port forwarding based on a specific IP address, and that address changes, your remote access will break.
To avoid this, you can assign a static IP address to your Raspberry Pi. This ensures that its IP address remains constant, regardless of how many times it reconnects to the network. To do this, you'll need to edit the Raspberry Pi's network configuration file. The exact location of this file depends on the operating system you're using, but it's typically located in `/etc/network/interfaces` or `/etc/dhcpcd.conf`. You'll need to specify the IP address, netmask, gateway, and DNS servers. Consult your operating system's documentation for detailed instructions.
Even with a static IP address on your Raspberry Pi, you might still encounter issues if your internet service provider (ISP) assigns you a dynamic public IP address. This is the IP address that your router uses to connect to the internet, and it can change periodically. If you're relying on your public IP address to connect to your Raspberry Pi, you'll need a way to keep track of these changes.
This is where Dynamic DNS (DDNS) comes in. DDNS is a service that automatically updates your domain name to point to your current public IP address. When your public IP address changes, the DDNS service will automatically update your domain name, ensuring that you can always connect to your Raspberry Pi using the same address. There are several DDNS providers available, both free and paid. You'll need to choose a provider, create an account, and configure your router to update the DDNS service whenever your public IP address changes.
If you have direct access to the Raspberry Pi (via keyboard and monitor), you can check the SSH service status. This will tell you whether the SSH server is running and listening for connections. To do this, open a terminal and run the command `sudo systemctl status ssh`. This will display the status of the SSH service, including whether it's active, enabled, and any error messages. If the SSH service isn't running, you can start it with the command `sudo systemctl start ssh`. If it's not enabled, you can enable it with the command `sudo systemctl enable ssh`. This will ensure that the SSH service starts automatically every time the Raspberry Pi boots up.
Sometimes, the issue isn't with your router or firewall, but with the Raspberry Pi's network configuration itself. Incorrect network settings can prevent the Raspberry Pi from communicating with the network, making it impossible to connect remotely. Verify that the Raspberry Pi has a valid IP address, netmask, gateway, and DNS servers. You can check these settings using the `ifconfig` command. Also, ensure that the Raspberry Pi is connected to the network using a working Ethernet cable or Wi-Fi connection. If you're using Wi-Fi, make sure that the Raspberry Pi is connected to the correct network and that the password is correct.
If you've tried all of the above steps and you're still unable to connect to your Raspberry Pi, you might need to resort to more advanced techniques, such as reverse SSH tunnels. A reverse SSH tunnel allows you to establish a connection from the Raspberry Pi to a remote server, and then use that connection to access the Raspberry Pi. This can be useful if your router is blocking incoming SSH connections, or if you're behind a network that uses Network Address Translation (NAT). To set up a reverse SSH tunnel, you'll need a remote server that you can connect to. You can use a cloud server, a VPS (Virtual Private Server), or even another computer on your home network. You'll need to configure the Raspberry Pi to connect to the remote server using SSH, and then configure the remote server to forward connections to the Raspberry Pi. This is a more complex process, but it can be a powerful tool for bypassing network restrictions.
Consider the frustrations echoed by users who've battled similar connectivity demons. One user recounted, "I tried Wi-Fi, which works well, but my intended setup requires an Ethernet connection." This highlights a common scenario where the problem is specific to the wired connection, suggesting a potential issue with the Ethernet cable, the Raspberry Pi's Ethernet port, or the router's Ethernet port. Another user shared, "I used different cables, checked settings on my router, restarted it, but the problem still persisted." This emphasizes the importance of systematically eliminating potential causes, even seemingly obvious ones.
Another user had a problem with time synchronization, stating "And if you are on a router behind nat\/firewall, it won't receive any response back." The user then states "I ended up uninstalled ntp and installing openntpd instead (also in the default repositories of raspbian)." They continues "Openntpd uses high source ports and doesn't require any configuration on the router."
Controlling your Raspberry Pi behind a router can feel like navigating a labyrinth, but with a systematic approach and a little technical know-how, you can conquer the challenges and unlock the full potential of remote access. Remember to meticulously check your port forwarding settings, firewall rules, IP addresses, and network configurations. Don't be afraid to explore advanced techniques like DDNS and reverse SSH tunnels if you're facing particularly stubborn network restrictions. By arming yourself with the knowledge and techniques outlined in this article, you'll be well-equipped to diagnose and fix the problem, ensuring that your Raspberry Pi is always within your reach.

Fix Raspberry Pi Control Behind Router Issues
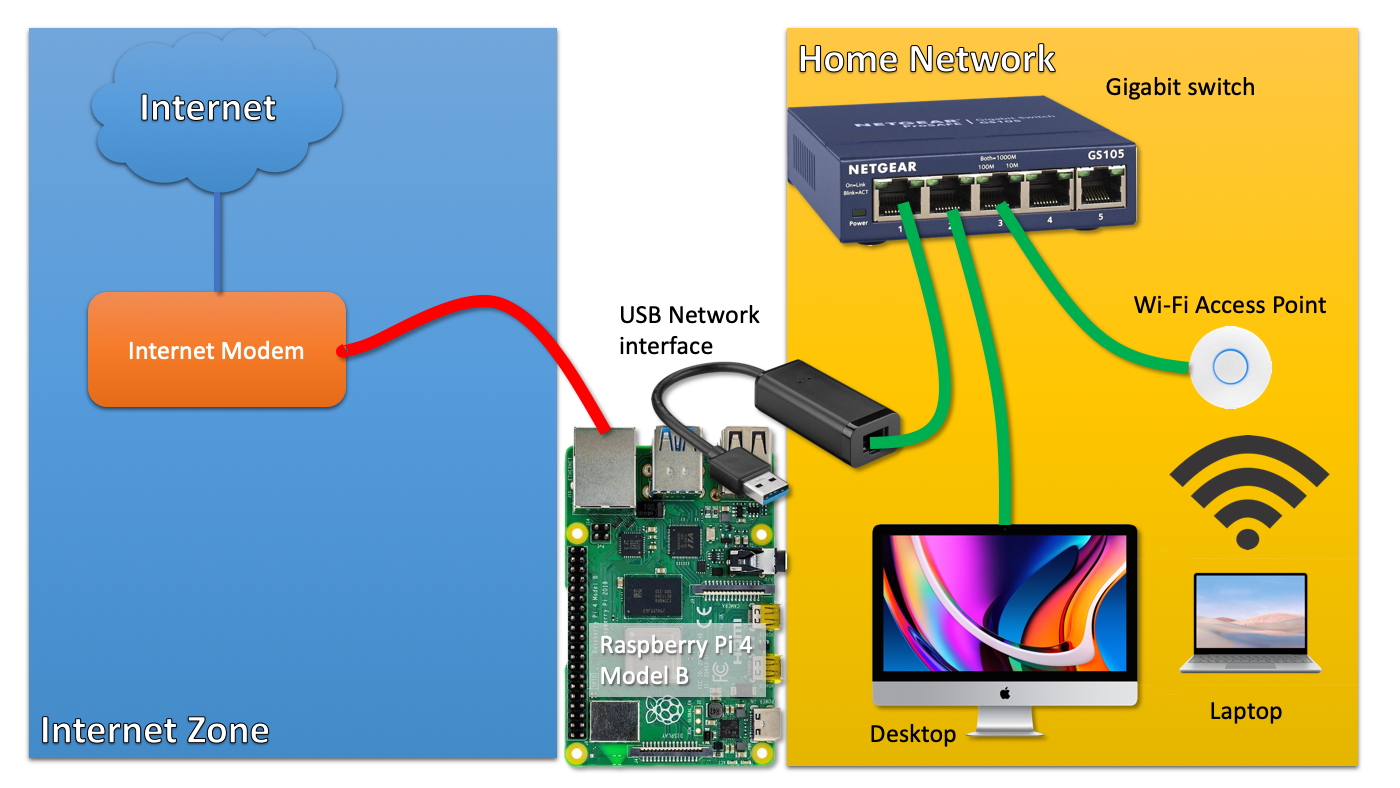
Raspberry Pi as a router using a single network interface
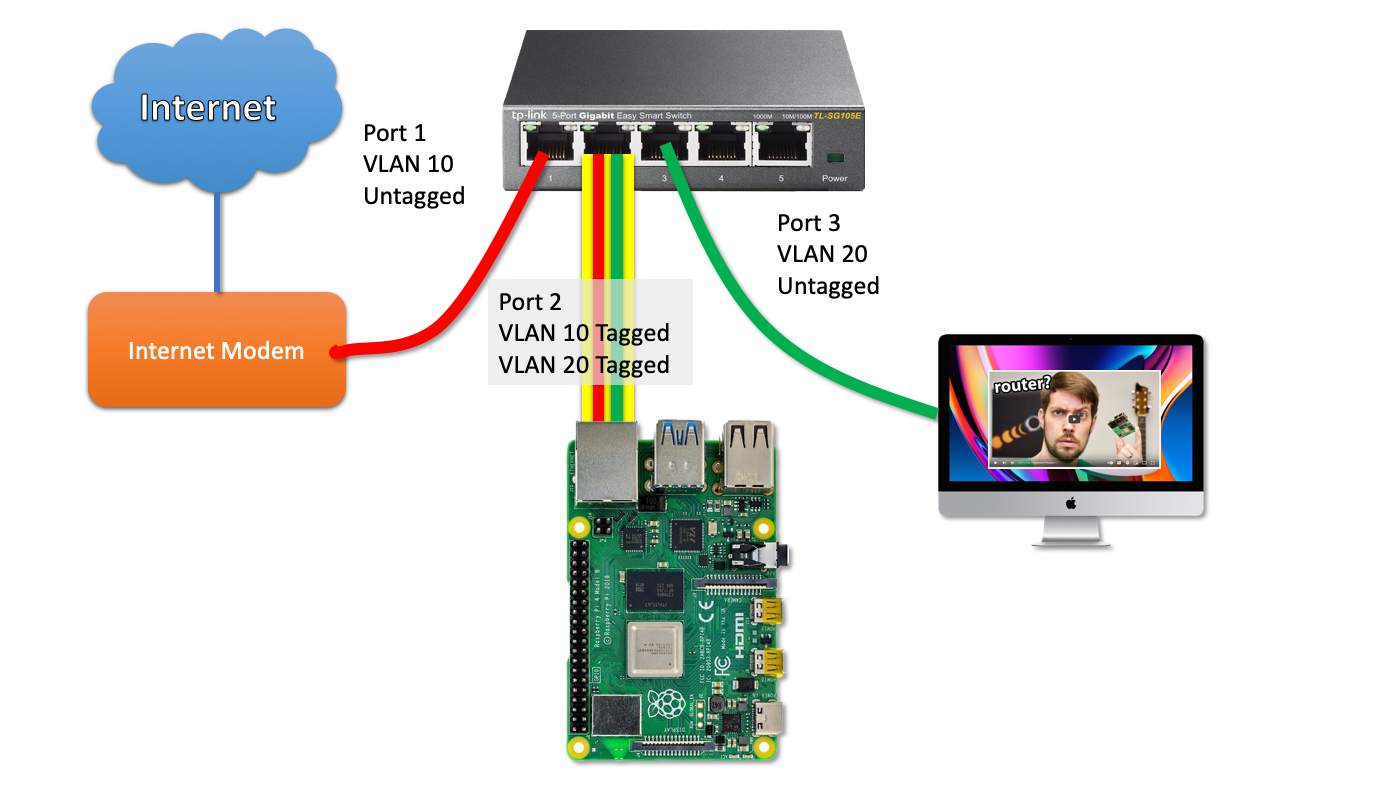
Raspberry Pi as a router using a single network interface
